简单分布式Masscan+Nmap

简单分布式Masscan+Nmap

转载请注明出处:https://youngrichog.github.io/

描述

主要从如何开始快速部署、扫描来思考,想在几天之内完成十几万台的端口扫描和指纹识别,然后就简简单单造个轮子,后续不停的扩容机器数量

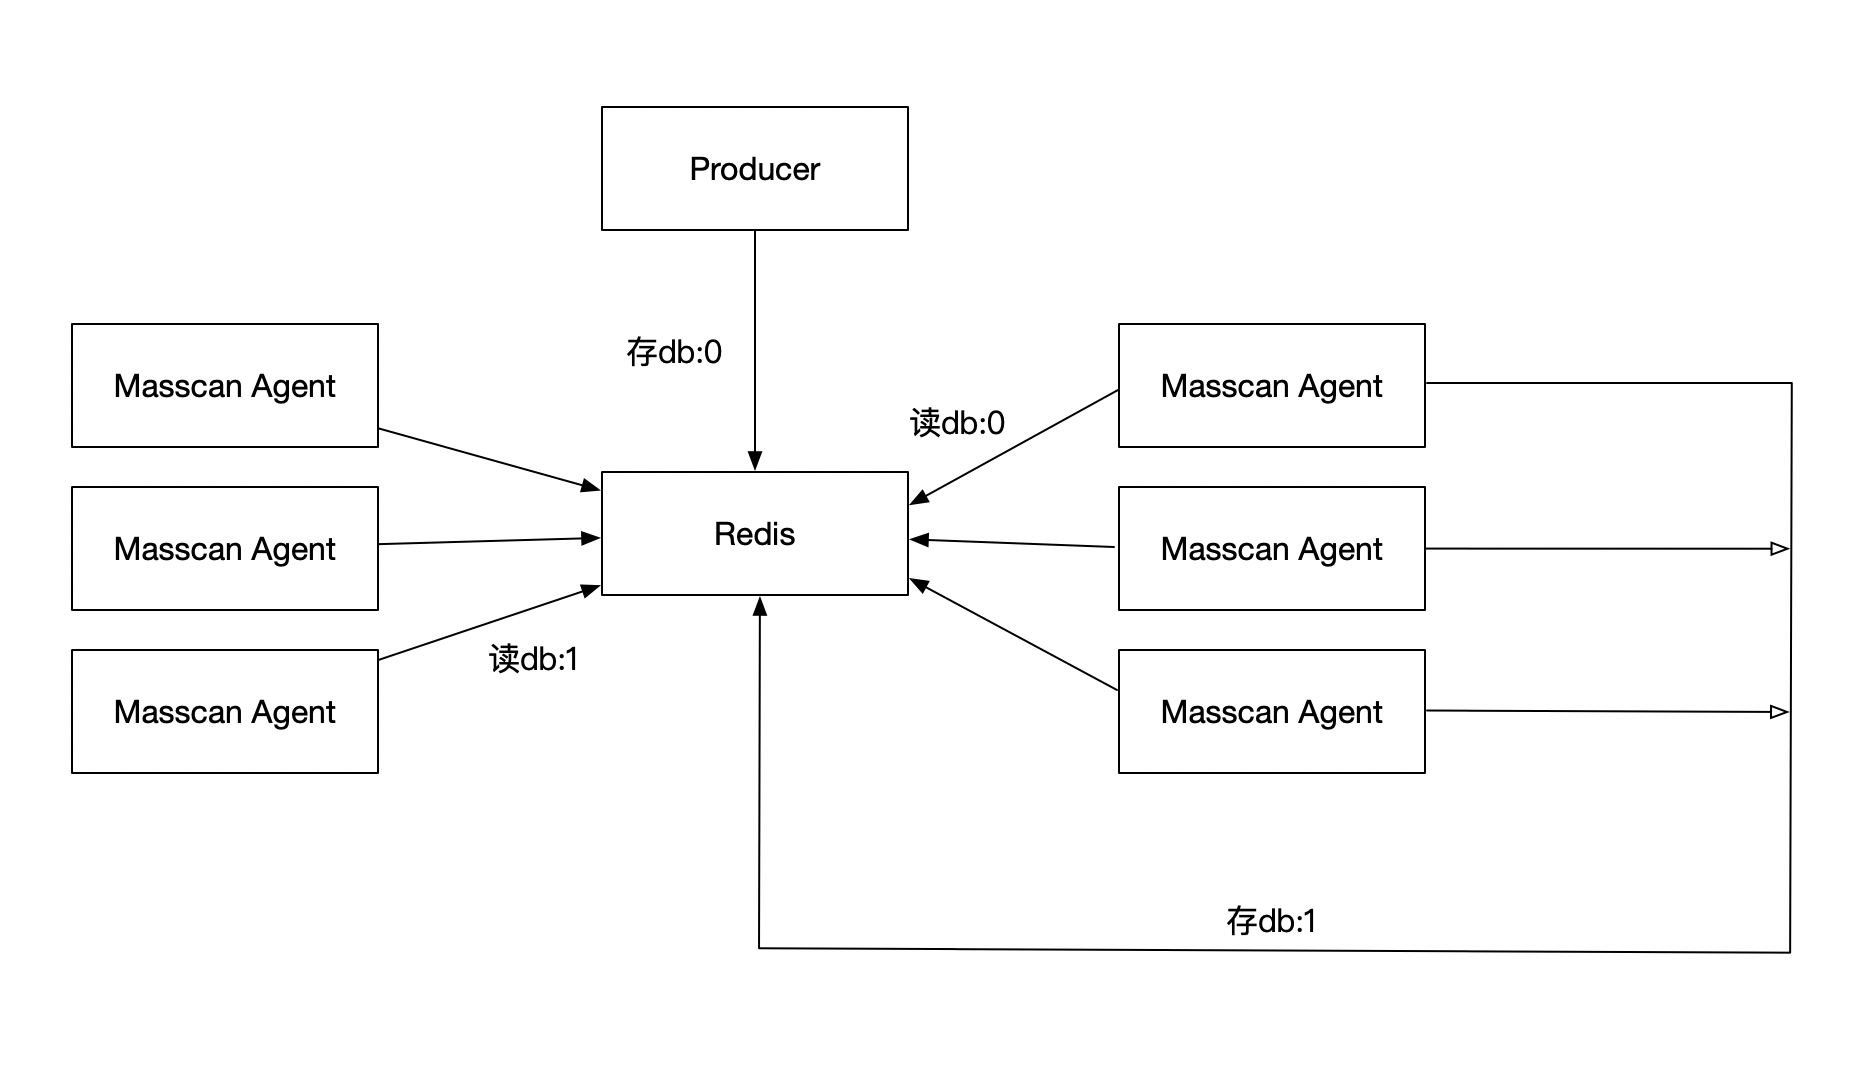
通过Masscan+Nmap+Redis实现,我们只需要把db:1的数据给丢上去,然后开masscan_agent不断的去取db:0的数据进行端口扫描,nmap_agent不断的去取db:1的数据进行指纹识别

db:0

该数据库主要存储待扫描的IP/IP段

db:1

该数据主要存储已经扫描完成的ip:port

img

具体实现

Massscan Agent 代码实现

1
2
3
4
5
6
7
8
9
10
11
12
13
14
15
16
17
18
19
20
21
22
23
24
25
26
27
28
29
30
31
32
33
34
35
36
37
38
39
40
41
42
#! /usr/bin/env python3
# -*- coding:utf-8 -*-

import masscan,redis,time

def consumer():
while True:
print('key:',r.keys())
if len(r.keys()) >0:
_key = r.randomkey()
ip = r.get(_key)
r.delete(_key)
status = masscan_plugin(ip)
else:
print('[*] 等待中···')
time.sleep(60)


def masscan_plugin(ip):
try:
mas = masscan.PortScanner()
mas.scan(ip,ports='1-65535',arguments='-Pn --max-rate=2000')
result = mas.scan_result['scan']
for key,value in result.items():
_len = len(value['tcp'].keys())
if _len < 50:
#过滤超过开了50个端口的ip,因为ids等原因导致
for k,kk in value['tcp'].items():
print(key+':'+str(k),key+':'+str(k))
rr.set(key+':'+str(k),key+':'+str(k))
except Exception as e:
print('Masscan Error:',e)


if __name__ == '__main__':
pool = redis.ConnectionPool(host='x.x.x.x',port=6379,password='xxxxx',decode_responses=True,db=0)
r = redis.Redis(connection_pool=pool)

pool_1 = redis.ConnectionPool(host='x.x.x.x',port=6379,password='xxxxx',decode_responses=True,db=1)
rr = redis.Redis(connection_pool=pool_1)

consumer()

Nmap Agent 代码实现

1
2
3
4
5
6
7
8
9
10
11
12
13
14
15
16
17
18
19
20
21
22
23
24
25
26
27
28
29
30
31
32
33
34
35
36
37
38
39
40
41
42
43
44
45
46
47
48
49
50
51
#! /usr/bin/env python3
# -*- coding:utf-8 -*-

import queue,nmap,threading,redis,time

def consumer():
while True:
if len(r.keys()) > 0:
_keys = r.keys()
_keylist = _keys[:10]
for ip in _keylist:
Queue.put(ip)
r.delete(ip)
threadscan()
else:
print('[*] 等待中···')
time.sleep(60)

def nmap_plugin():
while not Queue.empty():
_ipport = Queue.get()
ip = _ipport.split(':')[0]
port = _ipport.split(':')[1]
nm = nmap.PortScanner()
print('[*] 开始扫描:%s,%s' %(ip,port))
try:
nm.scan(ip,arguments='-sV -T4 -Pn --version-all -p{}'.format(port))
with open('nmap_res.txt','a+') as f:
f.write(nm.csv())
except Exception as e:
print('[*] Nmap Error:',e)

def threadscan():
Threads = []
for i in range(10):
thread_hi = threading.Thread(target=nmap_plugin)
thread_hi.start()
Threads.append(thread_hi)
for t in Threads:
t.join()

def main():
consumer()


if __name__ == '__main__':
pool = redis.ConnectionPool(host='x.x.x.x',port=6379,password='xxxxx',decode_responses=True,db=1)
r = redis.Redis(connection_pool=pool)

Queue = queue.Queue()
main()

Producer 代码实现

1
2
3
4
5
6
7
8
9
10
11
12
13
14
15
16
17
18
#! /usr/bin/env python3
# -*- coding:utf-8 -*-

import redis

def producer():
with open('iplist.txt','r') as f:
num = 0
for i in f:
num += 1
print('Insert:',num,i.rstrip())
r.set(num,i.rstrip())

if __name__ == '__main__':
pool = redis.ConnectionPool(host='x.x.x.x',port=6379,password='xxxxx',decode_responses=True,db=0)
r = redis.Redis(connection_pool=pool)

producer()

通过pssh我们可以批量ssh执行命令,pscp可以批量上传文件

pssh遇到公私钥登陆的时候会要选择yes/no,然后加上-O StrictHostKeyChecking=no就可以了

1
pssh -h iplist.txt -O StrictHostKeyChecking=no -P "whoami"

批量上传

1
pscp -h iplist.txt masscanAgent.py /tmp/

批量执行Agent并挂在后台

1
pssh -h iplist.txt -P "screen -dmS 'masscanAgent' bash -c 'python3 /tmp/masscanAgent.py'"